Quantcast
Channel: jalapeno – A Sweet Pea Chef

Baja Fish Tacos

$
0
0

This post was last updated on July 2, 2015 to include new images and a recipe video.
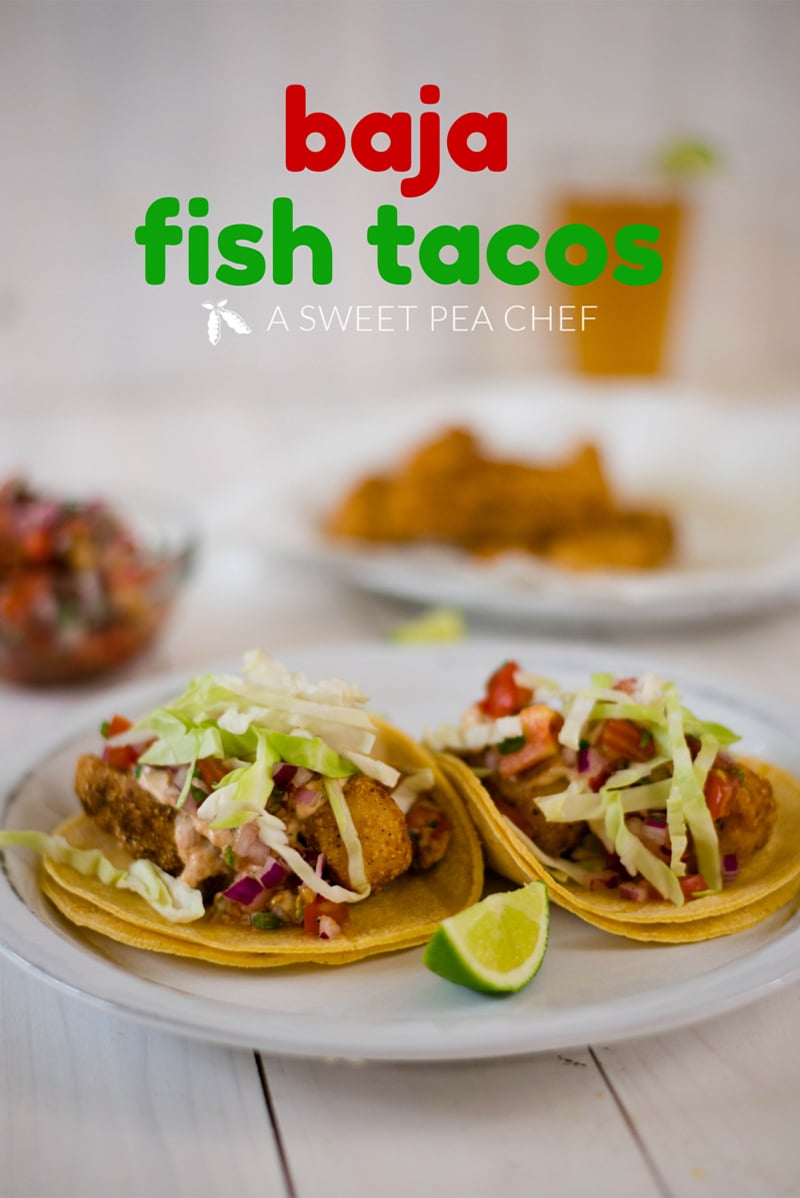
Baja Fish Tacos

Sadly, I find most restaurants just don’t know how to make good fish tacos.  Such a shame.
Baja Fish Tacos

It was in Baja California where my love for fish tacos began. When I was young, my parents owned a home in Ensenada (which is located on the coast of Baja California about 30 minutes south of the San Diego-Mexico border). To say we visited often would be a complete understatement. Pretty much every long weekend, most summers or days that ended with “y” were all good enough reasons for my parents to pack up the car and go.

Baja Fish Tacos

One of my favorite memories during these trips to Baja was making fish tacos with fresh rock cod and sea bass.  There was no question what we would make when we brought home the fresh fish.   What great memories. When Dustin and I moved to San Diego a few years ago, I kept seeing restaurants boast about their fish tacos.

These Baja Fish Tacos are simply amazeballs.Share this video with your friends!Print the recipe here –> http://bit.ly/1H4Cwit

Posted by a sweet pea chef on Friday, July 3, 2015

This brought back my good memories and renewed my cravings.  I searched and searched, but I couldn’t find anyone who could make good fish tacos. Crazy, right? What really frustrated me was that people around town would say, “[enter restaurant’s name] has the best fish tacos,” but, no sir, they did not. Was it possible I let my memories of blissful summers and beloved Baja fish tacos get the better of me? Were they actually that good, or had I made them better in my head over time? I hate when I do that!

Baja Fish Tacos

I realized I had to take matters into my own hands: I needed to make the fish tacos myself. Given that bringing a 15-month old on a fishing boat — no matter how cute he is — is never a good choice, store-bought “fresh” rock cod would have to suffice. I made fresh pico de gallo salsa with just enough heat to remember it on your lips. My favorite. I made a creamy white dill sauce that buckles the knees it’s so good. I thinly sliced the cabbage and cut the lime wedges. Such simple ingredients for such a truly delicious meal.

Baja Fish TacosBaja Fish Tacos

The verdict? They were fantastic. Just like I remembered. Well, except for the fresh, homemade corn tortillas like in Baja.  Some things are better left for the memories anyways.

I really recommend you try these tacos with the fresh pico de gallo and creamy white dill sauce. The combination is so, so very yummy. I prefer a cornmeal and flour mixture spiced with some cayenne pepper, garlic powder and black pepper for coating the fish, as opposed to a beer batter, because I find the fish gets lost in a beer batter. But, that’s just me.

Here’s to good — and tasty — memories!

ASPC on Instagram

If you give this recipe a try, let me know what you think by leaving a comment and rating it. And don’t forget to take a picture and tag it #asweetpeachef on Instagram! I LOVE seeing what you come up with. Enjoy!

5.0 from 1 reviews
Baja Fish Tacos with Fresh Pico de Gallo
 
Prep time
Cook time
Total time
 
These Baja Fish Tacos are so dang delicious, you're not even gonna know what hit you!
Author:
Recipe type: Easy
Serves: 4-6
Ingredients
  • FOR THE PICO DE GALLO (SALSA):
  • 2 medium tomatoes on the vine, diced
  • ½ small red onion, chopped
  • ½ tsp. jalapeno pepper, seeded and finely chopped
  • 4 sprigs cilantro, roughly chopped
  • 1 green onion, finely chopped
  • 1 garlic clove, minced
  • 1 tbsp. fresh lime juice
  • ⅛ tsp. kosher salt
  • ⅛ tsp. freshly ground black pepper
  • ⅛ tsp. cumin
  • FOR THE CREAMY WHITE DILL SAUCE:
  • ½ cup mayonnaise
  • ½ cup plain yogurt
  • juice from ½ a lime (approx 2 tbsp)
  • 1 tsp. jalapeno pepper, minced
  • ½ tsp. cayenne pepper
  • ½ tsp. dried oregano
  • ½ tsp. kosher salt
  • ½ tsp. cumin
  • ½ tsp. dried dill weed
  • ⅛ tsp. garlic powder
  • FOR THE TACOS:
  • 1 lb. fresh rock cod or sea bass fillet, cut into strips of 2-3 oz. portions
  • ¼ cup al-purpose flour
  • ¼ cup cornmeal
  • ½ tsp. kosher salt
  • ¼ tsp. cayenne pepper
  • ¼ tsp. garlic powder
  • ⅛ tsp. fresh ground black pepper
  • 1 egg, beaten
  • 2 tbsp. water
  • Peanut oil or vegetable oil
  • ½ head medium cabbage, thinly sliced
  • 8-10 good quality corn tortillas
Instructions
  1. FOR THE PICO DE GALLO (SALSA):
  2. Combine all ingredients in a medium bowl. Season with additional salt, lime, pepper and/or cumin to taste.
  3. Let sit for at least 30 minutes while you prepare the fish.
  4. FOR THE CREAMY WHITE DILL SAUCE:
  5. Combine all ingredients in a small bowl. Season with additional salt, lime, pepper and/or cumin to taste.
  6. Refrigerate while you prepare the fish.
  7. FOR THE FISH:
  8. In a flat dish, combine flour, cornmeal, salt, pepper, cayenne pepper and garlic powder. In a separate dish, combine egg with 2 tbsp. water.
  9. Pour enough oil into a large (12-inch) skillet to a depth of ¼ inch. Heat oil on high heat until hot and then turn to medium high heat.
  10. Dip fish into egg and then dust lightly with flour-cornmeal mixture.
  11. Fry until golden brown on all sides, approximately 4-6 minutes. Remove promptly and drain on a plate covered with paper towels.
  12. Wrap tortillas in a damp cloth or paper towel and microwave on high for 10-15 seconds.
  13. To serve, place a few pieces of fried fish on corn tortilla (you can use single or doubled tortillas, depending on your preference). Drizzle fish with desired about of Creamy White Dill Sauce and Fresh Pico de Gallo.
  14. Top with sliced cabbage.

The post Baja Fish Tacos appeared first on A Sweet Pea Chef.


Slow Cooker Chicken Tortilla Soup

$
0
0

Slow Cooker Chicken Tortilla Soup | So delicious, easy, and healthy! www.asweetpeachef.com

I honestly have no idea how I have never added a chicken tortilla soup recipe to the blog before.  It’s probably my favorite kind of soup ever, yet I haven’t ever made it for myself.

What’s up with that?

Slow Cooker Chicken Tortilla Soup | So delicious, easy, and healthy! www.asweetpeachef.comSlow Cooker Chicken Tortilla Soup | So delicious, easy, and healthy! www.asweetpeachef.com

So…since I’ve recently fallen in love with all things slow cooker AND I’ve been using mine like mad this season, I decided to make a slow cooker chicken tortilla soup.  Because, frankly, it was time.

And, oh my, it was amazing.

Not only did this soup make my house smell absolutely lovely, but the soup was hearty, flavorful, and so, so comforting – just what I love about chicken tortilla soup.

Slow Cooker Chicken Tortilla Soup | So delicious, easy, and healthy! www.asweetpeachef.comSlow Cooker Chicken Tortilla Soup | So delicious, easy, and healthy! www.asweetpeachef.comSlow Cooker Chicken Tortilla Soup | So delicious, easy, and healthy! www.asweetpeachef.com

Using all fresh ingredients for this recipe makes such a difference.  I used fresh tomatoes instead of diced tomatoes and really liked how the flavor turned out.  I also like adding some of the tortilla strips into the slow cooker in the beginning so they work to thicken the soup slightly as they dissolve into the liquidy tortilla soup goodness int he crock pot, slowly, throughout the day.

I tend to keep my distance from tortillas in general, but you just gotta splurge when making tortilla soup.  Duh.

And, in line with splurging, I had to make my own tortilla strips.  Please do this as well.  Your tastebuds will thank you ever so much.

Slow Cooker Chicken Tortilla Soup | So delicious, easy, and healthy! www.asweetpeachef.comSlow Cooker Chicken Tortilla Soup | So delicious, easy, and healthy! www.asweetpeachef.com

Making the fried tortilla strips takes just about 10 minutes from start to finish and I recommend doing it right before serving so they’re nice and crispy to add as a topping to the soup.  Just a handful will do.  Be strong.

To that end, a lot of what really makes chicken tortilla soup great are all of the toppings you can add which add more depth of flavor, texture, and interest to the soup.  Popular toppings are the tortilla strips, sliced or diced avocado, fresh tomatoes or salsa, shredded cheddar and/or jack cheese, a dollop of sour cream or (healthier) plain greek yogurt, and freshly squeezed lime juice.

Choose all of them or just a few, but please – oh please – choose toppings.  🙂

Slow Cooker Chicken Tortilla Soup | So delicious, easy, and healthy! www.asweetpeachef.comSlow Cooker Chicken Tortilla Soup | So delicious, easy, and healthy! www.asweetpeachef.com

I’ve also found that cooking chicken breast along with chicken thighs does a few amazing things in the slow cooker.  One, it makes the final chicken way more flavorful and juice (versus just breasts by themselves).  Two, it allows you to get the lower fat, healthier chicken breast without sacrificing on flavor or texture.  It’s been a real game changer for me and all the soups and stews I’ve been making.

I hope you enjoy this tortilla soup recipe as much as I do.  It’s easy to make and perfect for a fall day!

ASPC on Instagram

If you give this recipe a try, let me know what you think by leaving a comment and rating it. And don’t forget to take a picture and tag it #asweetpeachef on Instagram! I LOVE seeing what you come up with. Enjoy!

Slow Cooker Chicken Tortilla Soup
 
Prep time
Cook time
Total time
 
This Slow Cooker Chicken Tortilla Soup is so easy to make and will be the last tortilla soup recipe you'll ever need.
Author:
Recipe type: Healthy, Soup, Slow Cooker
Difficulty Level: Easy
Serves: 6
Ingredients
  • 1 lb. chicken breasts, boneless and skinless
  • 1 lb. chicken thighs, boneless and skinless
  • 4 large (approx. 4 cups) vine-ripened tomatoes, diced
  • ½ red onion, diced
  • ½ yellow onion, diced
  • 3 cloves garlic, minced
  • 3 cups chicken stock
  • ½ jalapeño, minced (seeds and membrane removed)
  • 1½ tsp. ground cumin
  • 1 tsp. kosher salt
  • ½ tsp. ground black pepper
  • 1 tsp. chili powder
  • ½ tsp. paprika
  • ½ tsp. dried basil
  • ½ tsp. dried oregano
  • ¼ tsp. cayenne pepper
  • 1 tbsp. lime juice (approx. ½ lime, plus more for garnish)
  • 1½ cups frozen corn kernels
  • 2 tbsp. fresh cilantro, chopped
  • 8 corn tortillas, sliced into strips, divided
  • ¼ cup olive oil, for frying the tortilla strips
  • avocado, sliced for topping
Instructions
  1. Lay the chicken into the bowl of a slow cooker.
  2. Top with the diced tomatoes, red onion, yellow onion, garlic, chicken stock, jalapeño, cumin, salt, pepper, chili powder, paprika, basil, oregano, cayenne, lime juice, corn, and cilantro. Stir to combine.
  3. Take 2 of the 8 corn tortillas (cut into strips) into the liquid in the slow cooker. This will thicken the broth and will dissolve as it cooks.
  4. Cover, and cook on low for 5-6 hours or on high for 3-4 hours.
  5. Once chicken is tender and can easily be pulled apart, remove from the pot and shred using your fingers (if cool enough) or use two forks. Shred into bite-size pieces and then return to the pot, stirring to incorporate.
  6. When ready to serve, heat the olive oil over medium-high heat in a wide pan. Slice the remaining 6 tortillas into thin, long strips.
  7. In batches, lightly fry the tortilla strips in the oil until golden brown and crispy. Remove and lay on paper towel to drain. Lightly sprinkle with salt, if desired.
  8. To serve, ladle the soup into a bowl. Top with the sliced avocado and fried tortilla strips. Squeeze a little more lime juice over top, if you'd like.
Nutrition Information
Serving size: 1 bowl Calories: 467 Fat: 22.1g Saturated fat: 5.9g Carbohydrates: 32.5 Sugar: 5.3g Sodium: 568.9mg Fiber: 5g Protein: 35.2g Cholesterol: 122.5mg
This post contains affiliate links for products I use in my kitchen and highly recommend.

The post Slow Cooker Chicken Tortilla Soup appeared first on A Sweet Pea Chef.

10 Minute Salsa Verde

$
0
0

10 Minute Salsa Verde | Delicious salsa verde in JUST 10 easy minutes! | A Sweet Pea Chef

I’m just gonna come out and say this: I love salsa.

Like love love.  I could probably find a way to incorporate some sort of salsa into almost any meal.

Did I just hear a challenge?  I think I did! 😉

I mean – a taco just isn’t right unless it has some salsa on it, am I right?  Or a burrito.  Or a bowl.  Or some eggs.

In my humble, salsa-loving opinion.  Which may be a bit biased.

10 Minute Salsa Verde | Delicious salsa verde in JUST 10 easy minutes! | A Sweet Pea Chef10 Minute Salsa Verde | Delicious salsa verde in JUST 10 easy minutes! | A Sweet Pea Chef

Somehow, though, over the years, I haven’t really spread the salsa love as much as I would have liked.

This would have been amazing for a few reasons:

  1. Because this would have meant I got to make and eat more salsa
  2. I love salsa

What I have done is include sauces in posts with other, larger recipes (like this (different, yet equally amazing) salsa verde with green chile pork tacos post or this killer honey mustard dressing in my mason jar salad post)

While this is handy if you happen to be making those recipes, it’s kinda hard to find the sauce/salsa you’re looking for if you don’t know which recipe it went with.

This is just no way to treat you.  Or salsa.

Hence: THIS 10 minute salsa verde post. BOOM.

Not only is this salsa uber amazingly delicious and ready in shockingly no time at all, it doesn’t “belong” to a bigger recipe.  Because it IS the recipe.

10 Minute Salsa Verde | Delicious salsa verde in JUST 10 easy minutes! | A Sweet Pea Chef10 Minute Salsa Verde | Delicious salsa verde in JUST 10 easy minutes! | A Sweet Pea Chef10 Minute Salsa Verde | Delicious salsa verde in JUST 10 easy minutes! | A Sweet Pea Chef

Salsa verde and pico de gallo are my two biggest fave salsas, hands down.  If I don’t have one, I want the other.  Or both.  Please don’t make me choose. Just give me both, thank you.

I just LOVE the slightly bitter, yet spicy kick of a tomatillos and jalapeno in a salsa verde, followed by the fresh, vibrant cilantro and lime – SO GOOD.

It also couldn’t be easier or quicker (hence: the name!).

I also happened to buy all the ingredients at the store this morning to make it, minus the sea salt which I already had.  And you know how much this salsa cost me?  $3.38.

$3.38 for 2 cups of liquid green salsa goodness (<—- was gonna say “salsa gold,” but that seemed a little weird ‘cuz gold and green are both colors, but that wasn’t how I meant gold…but you get my point, I think).

So: $3.38 + 10 minutes.  <—- Yaaaaaas!

10 Minute Salsa Verde | Delicious salsa verde in JUST 10 easy minutes! | A Sweet Pea Chef10 Minute Salsa Verde | Delicious salsa verde in JUST 10 easy minutes! | A Sweet Pea Chef

Now, I sure hope I’ve got you thinking, “Hmmm…I wonder what other salsas and sauces Lacey has on her blog that I’ve missed…”

To which, I give you the answer (heehee!):

I’m probably missing some sauces so let me know if you see any that aren’t on the list.

Did I mention I love sauces?

10 Minute Salsa Verde | Delicious salsa verde in JUST 10 easy minutes! | A Sweet Pea Chef

10 Minute Salsa Verde


Seriosuly.  If you love salsa, and you’ve got $4 and 10 minutes, please go make this.  And drizzle it on some nachos or tacos or eggs or a burrito or [fill in the blank].

So much yum.

10 Minute Salsa Verde
 
Prep time
Cook time
Total time
 
Easy, delicious, and flavorful salsa verde in just 10 minutes!
Author:
Recipe type: Salsa, Sauce, Quick Recipe, Clean Eating, Gluten-Free, Vegan
Difficulty Level: Easy
Serves: 2 cups
Ingredients
  • 10 tomatillos, de-husked and quartered
  • 1 jalapeño, seeded and sliced in half (use half for less spicy salsa)
  • 2 garlic cloves, unpeeled
  • 1 poblano chile, seeded and sliced in half
  • ⅓ sprig fresh cilantro, stems removed
  • 2 tbsp. lime juice (approx. 1 lime)
  • ½ tsp. sea salt
Instructions
  1. Preheat broiler to high and line a baking sheet with aluminum foil or parchment paper.
  2. Place the tomatillos, jalapeño, poblano, and unpeeled garlic cloves on the baking sheet and place into the oven to broil for 5-10 minutes, or until nicely charred.
  3. Transfer everything to a blender, along with fresh cilantro leaves, lime juice, and sea salt (don’t forget to remove the peel from the garlic).
  4. Blend until smooth.
Nutrition Information
Serving size: ¼ cup Calories: 17 Fat: 0.5g Saturated fat: 0.1g Carbohydrates: 3.4g Sugar: 1.9g Sodium: 120.3mg Fiber: 0.9g Protein: 0.5g Cholesterol: 0g
This post contains affiliate links for products I use regularly and highly recommend.

The post 10 Minute Salsa Verde appeared first on A Sweet Pea Chef.

Healthy Sheet Pan Breakfast Nachos

$
0
0

I’ve partnered with Jackson’s Honest to bring you a Healthy Sheet Pan Breakfast Nachos recipe that is going to blow you away. These breakfast nachos are a great option for your family in the morning or for brunch and are a fun new way to enjoy a healthy breakfast. 

Healthy Sheet Pan Breakfast Nachos | if you love breakfast AND you love nachos, I’ve got some great news! I’ve partnered with @JacksonsHonest to bring you a Healthy Sheet Pan Breakfast Nachos recipe that is going to blow you away | A Sweet Pea Chef #sponsored

Okay okay okay…guys!  Hold onto your seats…

If you love nachos (duh!) AND you love breakfast (double duh!), I’ve got some great news.  I’ve combined these two amazing things into an easy, delicious, and fun new breakfast.

I give you: sheet pan breakfast nachos!

These breakfast nachos make a fun breakfast or brunch and look amazing.  Plus they’re super easy to make and almost entirely fool-proof.

Essentially, this means three things for you: (1) Nachos, (2) For Breakfast, and (3) Easy Clean-up.
Bag of Jackson's Honest Sprouted Red Corn Tortilla Chips with tortilla chips coming out of the bag next to sheet pan lined with parchment paper and layered with more red corn tortilla chips

How Healthy Are Nachos?

The sad truth about nachos is they tend to not be a very healthy food.  They are often layered with lots of cheese and highly refined tortilla chips.  While this might make them a tasty appetizer, if you’re watching the food you’re eating and trying to eat healthy, they aren’t a great choice.

But the good news is there are several ways to make nachos a healthier and equally enjoyable appetizer or meal (or breakfast!).  For example, these sheet pan breakfast nachos are a well-balanced, high fiber, and high protein meal that IS healthy.  So, how do you make nachos healthy?

  • Replace your typical high sodium, highly processed tortilla chips with Jackson’s Honest Sprouted Red Corn Tortilla Chips.  These red corn tortilla chips have very simple ingredients (sprouted red corn, organic coconut oil, and sea salt), compared to less healthy chips.  They also contain 2g of fiber and 2g of protein per serving (10 chips), which makes them a nutritious part of the nachos.
  • Opt away from using cheese and, instead, make a savory mixture to add flavor.  In this recipe, I used a combo of chorizo, bell peppers, onion, and garlic.  These ingredients add lots of flavor and you don’t even miss the cheese.
  • Choose a clean, unrefined meat or protein.  Most sausages are packed with sugar and preservatives, but you can still find ingredient labels with just meat, water, and some minor spices if you take your time.  We also get protein from the eggs in these tasty nachos. The protein will help fill you up so you don’t wind up gorging on extra nachos or chips just to feel satisfied.
  • Use vibrant flavors as healthy flavor boosters.  In these breakfast nachos, I used jalapeño, green onions, and cilantro, but you could also use freshly squeezed lime juice for even more flavor.
  • Pack in extra fiber to make the nachos both filling and nutritious.  In these nachos, we added black beans, bell peppers, and red corn tortilla chips, which all boost the fiber content to over 13g per serving.

Overhead view of skillet with sauteed chorizo, red peppers, green peppers, garlic, and onion, ready to place on the sheet pan breakfast nachos.

What’s The Difference Between Sheet Pans and Cookie Sheets?

First off, let’s start with a little terminology because I think it can get a little confusing.  In case you’re wondering what the difference is between sheet pans, baking sheets, and cookie sheets, let me help explain.

I often hear people refer to “cookie sheets” as “baking sheets,” but they are actually not the same thing. Baking sheets (or baking pans) have rolled or rimmed edges, and cookie sheets do not. Cookie sheets (like we used for this Peanut Butter Protein Cookies recipe) are specifically made to have a large surface for holding a large number of cookies, but they don’t have edges so you can easily transfer cookies on and off.

Sheet pans, on the other hand, with their edges, allow for roasting (like we used for this Easy Parmesan Roasted Cauliflower) since the juices will run off the pan if there’s nothing to stop it.  They also allow for layering – say – for things like nachos!

So, when I talk about using a rimmed baking sheet, I mean the kind that has the edges all the way around — that way, it will hold in whatever you’re roasting, baking, or cooking, which is what it’s made to do.

Close up view of cooked sheet pan breakfast nachos with runny baked egg.

If you’ve gotten to this point and you’re still thinking about those eggs and how I baked them in the oven and it’s freaking you out, it’s okay.  I learned from my Baked Eggs in Spaghetti Squash Nests post that baked eggs aren’t for everyone.  And that’s totally fine.

If this sounds like you, feel free to fry the eggs on the stove and then gently place them on top of the nachos when they come out of the oven.  It’s an extra step and one additional dirty pan, but a completely legit way to make these nachos and still feel good about it.

Also, if you’re loving the idea of these breakfast nachos, but you don’t like chorizo, you have a ton of great options you can pick instead.

Here are a few:

  • go meatless
  • vegan chorizo
  • ground beef or bison
  • chicken sausage
  • shredded chicken
  • mushrooms

FYI I used a relatively small amount of chorizo for this recipe to cut down on fat and because chorizo has so much flavor so you may need to increase how much you use with other alternatives.

Overhead view of the baked healthy sheet pan breakfast nachos next to bag of opened Jackson's Honest Sprouted Red Corn Tortilla Chips, Ready To Eat.

All in all, these healthy sheet pan breakfast nachos are full of flavor and very satisfying.  The combination of flavors and textures is addicting and — even better — the clean-up is super quick, thanks to using a sheet pan!

However you choose to mix and match your healthy nachos recipe, remember to keep in mind the basic of how to make nachos healthy and just go from there.  There are so many topping possibilities and flavor combinations to customize your nachos and make them something truly amazing for you.

Healthy Sheet Pan Breakfast Nachos

Healthy Sheet Pan Breakfast Nachos

These healthy sheet pan breakfast nachos are a great option for your family in the morning or even for a brunch and are a fun new way to enjoy a healthy breakfast. 

  • 1 tbsp olive oil
  • 1/2 lb chorizo ( (see notes for how to choose))
  • 1/2 yellow onion, (diced)
  • 1/2 green bell pepper, (diced)
  • 1/2 red bell pepper, (diced)
  • 1/2 small jalapeño, (seeds removed and minced)
  • 1 clove garlic, (minced)
  • 1 10 oz bag Jackson's Honest Sprouted Red Corn Tortilla Chips
  • 1 15 oz can no sodium added black beans, (rinsed and drained)
  • 2 sliced green onions, (for topping)
  • 1 avocado, (thinly sliced, for topping)
  • 3 tbsp fresh cilantro (chopped, for topping)
  • 6 eggs
  • sea salt, (to season eggs)
  • black pepper, (to seas)
  • plain greek yogurt, salsa, lime (optional toppings)
  1. Start by preheating your oven to 425 degrees F and lining a rimmed baking sheet with parchment paper.
  2. Heat a skillet over medium-high heat and add olive oil.
  3. Next, add the chorizo, diced yellow onion, jalapeño, and bell peppers, and stir to combine.

  4. Cook, stirring frequently, until the chorizo is cooked through, approximately 4-6 minutes.

  5. Add minced garlic and cook an additional minute.

  6. Over the prepared baking sheet, make a double layer of the Jackson’s Honest Sprouted Red Corn Tortilla Chips out onto the prepared rimmed baking sheet.
  7. Next, add a layer of no sodium-added black beans over the red corn tortilla chips.
  8. Over the beans, layer the chorizo and bell pepper mixture.

  9. Place the sheet pan into the oven and cook until everything is heated through, about 10-12 minutes.
  10. Remove the pan from the oven and create 6 wells in the nachos for our eggs, depending on how many eggs you’d like.

  11. Gently crack an egg into each well, keeping the yolk intact if you can and season the eggs lightly with a little sea salt and pepper.
  12. Return the sheet pan to the oven and bake until the egg whites are set, about 9-12 minutes.  (If you’d rather just fry the eggs on the stove, you can do that and just top the nachos when they come out of the oven.)
  13. Remove the breakfast nachos from the oven and top with the green onions, sliced avocado, and cilantro.

For the chorizo, look for ingredient labels with very simple ingredients and no sugar added for the cleanest option.


This is a sponsored conversation written by me on behalf of Jackson’s Honest. The opinions and text are all mine.

This post contains affiliate links for products I use regularly and highly recommend.

The post Healthy Sheet Pan Breakfast Nachos appeared first on A Sweet Pea Chef.

Green Chile Chicken Enchiladas

$
0
0

 How to make green chile chicken enchiladas healthy and delicious! These shredded chicken enchiladas verdes are easy to make and freeze well, too.

Green Chile Chicken Enchiladas | How to make green chile chicken enchiladas healthy and delicious! | A Sweet Pea Chef

Believe it or not, one of my most popular recipes on the blog is my Shredded Chicken Enchiladas recipe.  It was one of the first ever recipes I shared when I was just learning how to take photos and run a blog.

Fast forward 7 or 8 years, google “Shredded Chicken Enchiladas,” any there’s my recipe at the top of Google.  Pretty crazy, right?

Back then, I used canned enchilada red sauce and quite a bit more cheese.  But, with this green chile chicken enchiladas recipe, I wanted to make everything from scratch and make them a healthier, lighter version of a popular enchilada recipe.

Plus: salsa verde rocks.

Large skillet with seasoned chicken breast and surrounded by by salsa verde, ready to cook. Bowl with shredded chicken that was cooked in green chile enchilada sause, as well as fresh cilantro, salsa verde, and shredded jack cheese, ready to stuff into the enchiladas.

I like anything salsa verde.  A lot.

You may have noticed this from my recipe for 10 Minute Salsa Verde. <— Perfection.

Or these Slow Cooker Green Chile Pork Tacos.

Or this Chile Verde.

Or this Crock Pot Enchilada Soup.

Seriously.  I may be obsessed.  But in a totally good way.  Because anything with salsa verde cannot be bad.

How to Make Green Chile Chicken Enchiladas Healthy

My main goal with these green chile chicken enchiladas was to make them healthy.  To do this, I used unprocessed, simple ingredients so I could avoid any extra, uneccesary fats, salts, and sugars.  I also reduced the amount of cheese in this recipe a ton.  While I don’t consider cheese to be an unhealthy ingredient, it does contain a lot of saturated fat so we do want to limit its use.

Instead of using canned enchilada sauce, I use my 10 minute salsa verde recipe which is a great from-scratch enchilada sauce recipe.  I hope you get a chance to make it for these enchiladas, but any salsa verde should do the trick.

A serving of these enchiladas, which I consider to be two enchiladas, contains just 417 calories and 34 grams of protein.  That means you’re getting a whole lotta protein in these enchiladas so you’ll be nice and full without consuming too many calories, too.

Casserole baking dish lined with green chile chicken enchiladas, along with corn tortillas and more shredded chicken mixture. Close up of casserole dish and several green chile chicken enchiladas, baked and ready to eat.

Can You Freeze Green Chile Chicken Enchiladas?

Yes, you can totally freeze your enchiladas.  There are a few tricks, however, to freezing enchiladas to keep them from getting mushy when you reheat them.  Here are my tips for how to freeze these green chile chicken enchiladas:

  • Allow the enchiladas to fully cool before wrapping and placing int he freezer.  If you freeze your food while it’s hot or warm, ice crystals can form on the surface, which will cause the tortillas to get mushy when reheating and before it’s fully frozen.
  • Wrap the individual enchilada servings in plastic freezer wrap, airtight.  Then, place the the wrapped enchiladas into a freezer bag.
  • Add any cheese to the top when reheating, not before freezing.  If you know you’re going to be freezing these enchiladas ahead of time, choose to add the cheese once you’re reheating as cheese can deconstruct when frozen.  Not a huge deal, though, since there isn’t much cheese in this recipe.
  • Freeze them as quickly as possible once cooled to prevent them from getting mushy.
  • Bake to reheat, rather than microwave.

Casserole dish with baked green chile chicken enchiladas, topped with salsa verde, fresh cilantro, diced red onion, and melted jack cheese, cooked and ready to enjoy.

Corn or Flour Tortillas?

There are many ways to answer this, but my best answer is to choose whichever tortilla you prefer. I prefer corn tortillas for enchiladas because they hold up better and I prefer the flavor BUT flour tortillas are perfectly good, too.  Some people complain that corn tortillas are too dry, while others complain that flour tortillas get too chewy in enchiladas. Ultimately, it’s up to you and what makes you happy.

The issue I find with flour tortillas is they are more difficult to find with minimally processed ingredients.  It’s much easier to find corn tortillas at the store with just a few simple, unrefined ingredients, so that’s a big plus for me.  I usually wind up buying whole wheat/grain tortillas for my flour tortillas.

To keep my corn tortillas from getting too dry, I brush them with a little olive oil before they go in the oven so they don’t dry out while baking.  If you’d like to make your own corn tortillas, these ones are super duper extra special delish.

Green Chile Chicken Enchiladas

Green Chile Chicken Enchiladas

How to make green chile chicken enchiladas healthy and delicious!

For the Salsa Verde: (yield 4 cups)

  • 4 cups salsa verde
  • 1/2 cup plain greek yogurt

For the Chicken:

  • 1 lb. boneless, skinless chicken breasts
  • 1/2 tsp. sea salt
  • 1/4 tsp. black pepper
  • 1 tbsp. olive oil

For the Enchiladas:

  • 10-12 7-inch corn tortillas
  • 1 1/3 cups jack cheese, (shredded, divided)
  • 1/3 cup cilantro, (chopped)
  • 1/4 red onion, (diced)
  1. Preheat oven to 400 degrees F and grease a 9×13 baking dish with olive oil. Set aside.

  2. Combine the greek yogurt with my 10 minute salsa verde recipe in a kitchen blender and blend until smooth.  Set aside.

  3. Heat olive oil in large pan over medium-high heat and add the chicken. Season with sea salt and pepper. Brown on both sides, cooking about 2-3 minutes per side.
  4. Pour the salsa verde from the blender over and around the browned chicken in a large pan and heat over medium-high heat, until boiling.

  5. Reduce the heat to low, cover and cook until the chicken is cooked through, about 10-12 minutes. Remove the chicken from the sauce, set aside and let both the chicken and the sauce cool.

  6. Using two forks, shred the chicken breasts by holding one fork steady and slowly scraping the other fork, prongs faced backwards, away from the other fork.
  7. Transfer the shredded chicken to a large bowl. Add 1 cup of the jack, the cilantro, and half the chile verde enchilada sauce (from the pan) to the shredded chicken. Stir to combine.
  8. Place filling in the center of the tortillas, roll then up gently, and then arrange in pan, seam-side down. You can lightly coat with olive oil to help keep them from cracking in the oven.
  9. Cover with remaining sauce and remaining cheese.
  10. Place into the oven and bake for 12-15 minutes, until bubbly.
  11. Top with fresh cilantro and diced red onion.

You can use any salsa verde, but I highly recommend using my 10 minute salsa verde because it’s super yummy and only take 10 minutes to make.

This post contains affiliate links for products I highly recommend and use regularly.

The post Green Chile Chicken Enchiladas appeared first on A Sweet Pea Chef.

Butternut Squash Instant Pot Chili

$
0
0

Enjoy this hearty, healthy, and EASY butternut squash Instant Pot chili — ready in just 20 minutes! This Instant Pot chili is vegan, GF, paleo, and clean eating approved.

Butternut Squash Instant Pot Chili | How to cook butternut squash Instant Pot chili with canned beans and fresh butternut squash. Ready in less than 30 minutes! | A Sweet Pea Chef

Yes, it took me what feels like FOREVER to finally buy an Instant Pot.

Yes, I’ve been wanting to make butternut squash chili for like EVER.

Yes, I jumped for joy when I learned I could make butternut squash Instant Pot chili in under 20 minutes.

No, I didn’t believe the chili only had to be under pressure for 6 minutes.

Yes, I was wrong.  Again, amazed.

Yes, all hail the Instant Pot and this butternut squash Instant Pot chili right here.

It’s vegan, GF, paleo, clean, darn easy, and super fast.

Yes, I’m already planning out my next Instant Pot recipes (see more below on that!).

Whole butternut squash which is partially peeled using a vegetable peeler. Bowl of cubed butternut squash which has been peeled, removed seeds, and diced into cubes.

How to Cook Butternut Squash in an Instant Pot

Fortunately, cooking butternut squash in an Instant Pot is super easy and doesn’t take much time at all.  Here are the steps you’ll need to follow for how to cook butternut squash in an Instant Pot (instructions also below in this butternut squash Instant Pot chili recipe):

  1. Remove the skin of the butternut squash using a vegetable peeler
  2. Slice both ends off the butternut squash
  3. Slice the squash in half using a large, sharp knife
  4. Remove the seeds from the inside of the squash and then discard the seeds
  5. Lay the cut halves cut-side down on a cutting board and then dice into 1-inch cubes
  6. Place into the Instant Pot, along with the other ingredients for the chili
  7. Close the lid and set valve to Sealing
  8. Press the Manual/Pressure Cook button and cook on high pressure for 6 minutes
  9. Let the pressure release naturally for 10 minutes and then release the remaining pressure manually

If you’re going to cook the butternut squash in an Instant Pot by itself for a recipe other than this chili, you’ll want to add a little liquid as well to help cook and steam it while it’s under pressure.

Various ingredients ready to add to the Instant Pot to make the Butternut Squash Instant Pot Chili, including the cubed butternut squash, canned black beans, bay leaf, paprika, diced red onion, and fresh tomatoes. View of the butternut squash instant pot chili which has been cooked and is ready to serve.

How To Convert an Instant Pot Recipe into a Slow Cooker Recipe

Don’t yet have an Instant Pot?  That’s ok!  It took me a while to jump on buying one, too. The good news is you can easily convert this Instant Pot chili recipe into a slow cooker recipe.

While you won’t be able to saute the same way in your slow cooker, you can either choose to saute the onion in a separate skillet and then transfer into the slow cooker or just skip that step.  Then, add everything into the slow cooker as you would the Instant Pot, cover, and cook on low for 6-7 hours or on high for about 3-4 hours, or until the butternut squash is tender.

If you’re ready to get your own Instant Pot, this is the one I use and it’s been awesome!

Bowl of butternut squash instant pot chili from overhead, which is topped with fresh cilantro and sliced jalapeno pepper.

Bowl of butternut squash instant pot chili, where you can see the cooked, diced butternut squash, cooked black beans, tomatoes, and it is topped with fresh avocado, lime wedge, jalapeno, and cilantro.

More Healthy Instant Pot Recipes

Now that I’m on the Instant Pot wagon and have seen how easy and quick it is to make awesome food, I’m planning to make all sorts of Instant Pot recipes.  Here’s what I have shared so far on the blog:

What Instant Pot recipes would you like me to make next?  Share in the comments below!

Butternut Squash Instant Pot Chili

Enjoy this hearty, healthy, and EASY butternut squash Instant Pot chili — ready in less than 30 minutes!

  • 1 tbsp olive oil
  • 1 red onion, (diced)
  • 2 garlic cloves (finely chopped)
  • 1/2 small jalapeno, (chopped (seeds removed))
  • 1/2 tsp cumin
  • 1/2 tsp paprika
  • 1 tsp sea salt
  • 1/2 tsp ground black pepper
  • 1 15.5 oz. can black beans (no salt added)
  • 2 large tomatoes, (diced)
  • 1 cup vegetable broth
  • 4 cups butternut squash, (cubed)
  • 1 bay leaf
  • optional: lime wedge, fresh cilantro, avocado ((for garnish))
  1. Press the “Saute” button on the Instant Pot and add the olive oil. 

  2. Once the oil is hot, add the red onion, garlic, jalapeno, sea salt, black pepper, paprika, and cumin. Cook until the onions are soft, around 3-4 minutes.

  3. Stir in the black beans, diced tomatoes, and the broth.

  4. Add butternut squash on top of the mixture; do not stir.

  5. Close the Instant Pot lid and set valve to sealing. Press the “Manual” button and cook on high pressure for 6 minutes.

  6. Let the pressure release naturally and then release the remaining pressure manually.

  7. Remove and discard the bay leaf.

  8. Serve the butternut squash chili topped with a lime wedge, fresh cilantro, and diced avocado.

This post contains affiliate links for products I use regularly and highly recommend.

The post Butternut Squash Instant Pot Chili appeared first on A Sweet Pea Chef.

Spicy Quinoa and Black Bean Vegan Enchiladas

$
0
0

This Spicy Quinoa & Black Bean Vegan Enchiladas recipe is my go-to when I want to satisfy my craving for enchiladas while still eating clean. This vegan enchiladas recipe features a super easy 10-minute Vegan Red Enchilada Sauce. So tasty and so satisfying!

Spicy Quinoa and Black Bean Vegan Enchiladas | This Spicy Quinoa & Black Bean Vegan Enchiladas recipe is my go-to when I want to satisfy my craving for enchiladas while still eating clean. Features a super easy 10-minute Vegan Red Enchilada Sauce. Yum! | A Sweet Pea Chef

By now you must already know that I absolutely love enchiladas. What’s not to love, right? Soft corn tortillas filled up with deliciousness of your choice and covered with a chili pepper sauce (or any other for that matter). And, since my Shredded chicken enchiladas recipe is one of the most popular posts on the blog, I know you love them, too!

One of my favorite things about this traditional Mexican dish is that it’s so versatile. It’s so easy to play around with flavors and textures and add something new and different every time. So far, I’ve tried pretty much everything I could think of, from these Green Chile Chicken Enchiladas with salsa verde to this rich and savory Ground Beef Enchiladas recipe.

Close up image of a spoon stirring the onions and jalapenos on olive oil in a large skillet for the Spicy Vegan Enchiladas filling. Overhead image of a blender with the homemade Vegan Enchilada sauce with diced fresh tomatoes, minced garlic, tomato paste, low sodium chicken broth, chili powder, onion powder, cumin, oregano, sea salt, and black pepper.

As much as I’d maybe like to eat just enchiladas for days on end sometimes, it’s important to still eat balanced and healthy. With a little help of my crock pot, I’ve even managed to turn this beloved dish into a healthier, but nonetheless delicious Crock Pot Chicken Enchilada Soup.

This time, I’ve decided to swap the meaty filling with one of my favorite grains – quinoa!

Quinoa is not only gluten-free but also high in fiber and protein. On top of that, quinoa also happens to be very high in antioxidants which makes it a perfect choice when you’re trying to eat healthier, and when you’re trying to make a more nutritious vegetarian and vegan-friendly version of your favorite comfort food.

Close up image of a spoon stirring the Spicy Vegan Enchiladas filling: garlic, cumin, sea salt, cooked quinoa, the homemade Vegan Enchilada Sauce, black beans, chopped cilantro, and lime juice in a large skillet. Overhead image of the Spicy Vegan Enchiladas: tortillas with the spicy quinoa and black bean enchilada filling in Homemade Vegan Enchilada Sauce in a casserole dish, ready to be placed in the oven to bake.

Follow my recipe for Spicy Quinoa & Black Bean Vegan Enchiladas With Homemade Vegan Enchilada Sauce (that’s ready in just 10 minutes!) and whip up this crowd-pleaser next time you’re having friends or family over for dinner.

Put in a tiny bit more effort and make this dish even healthier by swapping regular, store-bought tortillas for these 4 ingredient vegan Corn Tortillas.

Close up image of the Spicy Vegan Enchiladas: tortillas with the spicy quinoa and black bean enchilada filling and Homemade Vegan Enchilada Sauce topped with fresh cilantro, diced tomatoes and avocado, lime, and a little drizzle of non-dairy yogurt.

How to Make Enchiladas Vegan

Enchiladas are definitely one dish that can easily be turned vegetarian or vegan. It’s pretty easy to do so, too. Basically, if you want to make a vegan version of this all-time favorite, the first step is swapping the meat filling with a vegan-friendly option. I decided to fill my Spicy Vegan Enchiladas with quinoa and black beans, so they are both a  quite filling and also good for you!

Side angle of a casserole dish filled with the spicy quinoa and black bean vegan enchiladas, topped with tomatoes, jalapenos, cilantro, avocado, and vegan enchilada sauce.

How to Make Enchiladas Without Cheese

Traditional enchilada recipes call for cheese, but if you’re making vegan enchiladas, cheese is not really an option, right? That might not even be such a bad thing, as cheese is, in general, a high-fat food, depending on the type of cheese you choose. You can always use vegan cheese, but I find topping off my Spicy Vegan Enchiladas with some fresh cilantro, diced tomatoes and avocado, lime, and a little drizzle of non-dairy yogurt an even better option. Yum!

Horizontal image of the spicy quinoa and black bean vegan enchiladas, ready to eat, topped with fresh cilantro, diced tomatoes, lime wedges, and jalapeños.

How to Make Vegan Enchilada Sauce

The super easy vegan enchilada sauce I used in my Spicy Vegan Enchilada recipe is not only delicious but it will take you only 10 minutes to make it. Yes, from scratch! Not only is it healthier, but it’s also quicker to prep the sauce yourself instead of running to the store to buy one.

All you need to do is cook diced fresh tomatoes with some minced garlic until the tomatoes become softened. Then, stir in the remaining ingredients and continue to cook over medium-high heat for 5 minutes until slightly thickened. Transfer this mixture to a blender or a food processor and blend until smooth. And that’s it!

Spicy Quinoa and Black Bean Enchiladas

Spicy Quinoa and Black Bean Vegan Enchiladas

This Spicy Quinoa & Black Bean Vegan Enchiladas recipe is my go-to when I want to satisfy my craving for enchiladas while still eating clean. This vegan enchiladas recipe features a super easy 10-minute Vegan Red Enchilada Sauce. So tasty and so satisfying!

For The 10 Minute Vegan Red Enchilada Sauce:

  • 2 tbsp olive oil
  • 3 large tomatoes on the vine, (diced plus more for topping)
  • 3 cloves garlic, (minced)
  • 1 tbsp chili powder
  • 1 tsp ground cumin
  • 1/2 tsp granulated onion
  • 1/2 tsp dried oregano
  • 1 tsp sea salt

For The Vegan Enchiladas:

  • 1 tbsp olive oil
  • 1 yellow onion, (diced)
  • 1 jalapeño, (seeded and diced (plus more for topping))
  • 2 cloves garlic, (minced)
  • 1 1/2 tsp ground cumin
  • 1 cup quinoa, (cooked)
  • 1 tsp sea salt
  • 2 tbsp tomato paste
  • 1 1/2 cups low sodium vegetable broth
  • 3 cups red enchilada sauce ((see recipe above), divided)
  • 1/2 14-oz can black beans, (drained and rinsed)
  • 2 tbsp fresh lime juice (approx. 1 lime), (plus more for serving)
  • 1/2 cup fresh cilantro, (chopped, plus more for serving)
  • 10-12 corn tortillas
  • avocado, (for topping)
  • dairy-free yogurt, (for topping)

For The 10 Minute Vegan Red Enchilada Sauce:

  1.  In a large skillet, heat olive oil over medium-high heat.

  2. Add in diced fresh tomatoes and minced garlic, and stir to combine. Cook for 4-6 minutes, until the tomatoes become softened.
  3. Then, stir in the tomato paste, low sodium chicken broth, chili powder, onion powder, cumin, oregano, sea salt, and black pepper, and continue to cook over medium-high heat for 5 minutes until slightly thickened.
  4. Transfer this mixture to a blender or food processor and blend until smooth. Poof: red enchilada sauce. So set this aside while we get our vegan enchiladas ready to go.

For The Vegan Enchiladas:

  1. Start preheating your oven to 375 degrees F and grease a 9×13 casserole dish with olive oil.

  2. In a large skillet, heat the olive oil over medium-high heat.
  3. Add the onions and jalapeño, and cook until the onion is softened, about 5-6 minutes.
  4. Add the garlic, cumin, sea salt, and cooked quinoa and stir to combine, cooking for about a minute until the garlic is fragrant.
  5. Add in half the enchilada sauce, black beans, chopped cilantro, and lime juice, and stir together.

  6. To make sure your tortillas don’t crack, you could lightly brush the exposed tortillas with olive oil, give them a quick dip in olive oil or enchilada sauce, or heat in the microwave for about 20 seconds wrapped in a damp towel.
  7. Spoon about 1/4 cup of the spicy quinoa and black bean mixture along the center of a tortilla. Then, gently, but firmly, roll the tortilla around the filling and place into baking dish, seam-side down. Repeat with remaining tortillas.

  8. Pour the enchilada sauce over and around the enchiladas, and then add a little more of the filling over the top for some added texture.
  9. Then, place the casserole dish in the oven, uncovered, for 12-15 minutes or until the tortillas begin to turn golden and the enchilada sauce becomes a darker red.
  10. To serve, top with fresh cilantro, diced tomatoes and avocado, lime, and a little drizzle of non-dairy yogurt.

If you want to make your own corn tortillas for this enchilada recipe, check out my super easy recipe for the best 4 ingredient vegan corn tortillas here!

 This post contains affiliate links for products I use regularly and highly recommend.

The post Spicy Quinoa and Black Bean Vegan Enchiladas appeared first on A Sweet Pea Chef.

Healthy Chicken Fajitas Meal Prep | Meal Prep On A Budget (Just $3.37!)

$
0
0

This Healthy Chicken Fajitas Meal Prep includes healthy chicken fajitas with fresh fajita veggies and the most amazing spicy black beans.  This is a low carb, high protein, and high fiber meal prep you’re gonna love. Bonus: this chicken meal prep is just 455 calories and is a great meal prep on a budget since each serving costs just $3.37!

Healthy Chicken Fajitas Meal Prep (Just $3.37 Per Serving!) | This Healthy Chicken Fajitas Meal Prep includes healthy chicken fajitas with fresh fajita veggies and the most amazing spicy black beans.  This is a low carb, high protein, and high fiber meal prep you’re gonna love. Bonus: this chicken meal prep is just 455 calories and is a great meal prep on a budget since each serving costs just $3.37! | A Sweet Pea Chef

We eat a lot of fajitas. And absolutely LOVE them.  It’s one of the rare meals that Dustin and I both very much enjoy when ordering at restaurants.

Unfortunately, most chicken fajitas are loaded in added oil and salt, and then wrapped in refined flour tortillas.

Plus: I don’t want to go out to dinner every time the fajita craving hits.  Because it hits a lot.

Enter Meal Prep Healthy Chicken Fajitas.

I especially love that I can make one of our favorite dishes ahead of time and then just grab it from the fridge and have a home cooked, delicious, and healthy dinner or lunch served in a matter of minutes.

An overhead image of skinless, boneless chicken breasts in a marinade of lime juice, pineapple juice, low sodium soy sauce, garlic, ground cumin, paprika, red pepper flakes, cilantro, olive oil, sea salt and ground black pepper for the Healthy Chicken Fajitas.

If you’re new to meal prep, these Healthy Chicken Fajitas are a great recipe to get you started. I mean, you are having FAJITAS for dinner.

FAJITAS!

Meal prep really helped me get on the healthy, clean eating path.  Planning just makes everything so much easier, especially when you’re just starting out.

Follow my easy step-by-step Meal Prep Healthy Chicken Fajitas recipe and learn how to meal prep like a pro.

An overhead image of cooked boneless, skinless chicken breast in a pan for the Healthy Chicken Fajitas.

HOW TO MEAL PREP CHICKEN

Chicken is definitely one of the healthiest and easiest options for protein when meal prepping.  I mean…you really can’t go wrong with chicken. It’s simple to season, fairly quick to cook, and it’s good for you!  If you’re planning to meal prep chicken, the first thing to do is to choose a recipe that’s good for meal prep. These Healthy Chicken Fajitas are a great one, believe me.

When meal prepping chicken, it’s crucial not to skip the first and the most important step – marinate. Marinating the chicken breasts for at least a half an hour makes so much of a difference. Your chicken will be even more flavorful, juicy, and moist!

I also recommend that you cook your chicken breasts whole and THEN dice it when storing it, instead of cutting it up in bite-sized pieces before cooking.  This helps keep so much of the juices inside and keeps the chicken from overcooking.  Game changer.

You can choose either chicken breasts or chicken thighs, but I tend to use boneless, skinless chicken thighs for the highest protein, lowest fat options when meal prepping.  They’re just a great protein for weight loss and a healthy lifestyle.

An overhead image of a baking sheet with cooked boneless, skinless chicken breast for the Healthy Chicken Fajitas.

HOW TO SAVE TIME WITH CHICKEN MEAL PREP

I’m all about saving time and being as efficient as possible, especially when I’m cooking.  That’s why I love meal prep.  Prepping out your meals in bulk takes far less time than cooking every meal from scratch every day.  Shoot – it even saves more time than going out to restaurants every day. Also, you know you have something delicious and healthy waiting for you in the fridge so ordering takeout for dinner won’t even cross your mind.

Chicken meal prep is a great way for you to make sure you eat nutritious meals throughout the week. Chicken keeps very well in the fridge, which makes it ideal for meal prep. To add some variety, use different cooking techniques when making chicken meal prep and play around with side dishes and different pairings. From healthy sandwiches, salads, wraps, to one of my personal favorites – Healthy Chicken Fajitas!

An overhead image of a spoon stirring Lime and Cilantro Black Beans in a pan, made with canned low sodium black beans, jalapeno, low sodium chicken broth, garlic, fresh cilantro, olive oil, sea salt, cumin and lime juice.

WHAT GOES ON HEALTHY CHICKEN MEAL PREP?

I usually opt for boneless, skinless chicken breasts instead of chicken thighs for my chicken meal prep. If you’re trying to stick to your healthy eating plan, chicken breast is definitely one of the best and healthiest protein sources you can add to your diet.

Thankfully, being low in calories and fat does not mean it’s lacking in flavor.  To add additional zest, try out different marinades to infuse your chicken with flavor.

An overhead image of a pan with red bell peppers, green bell pepper, onion, poblano chile, ground black pepper and sea salt for Fajita Bell Peppers.

HOW LONG CAN YOU KEEP COOKED CHICKEN?

Wondering how long it’s safe to keep cooked chicken in the fridge?  How long chicken will last in your fridge really depends on how you store it.

When stored in the refrigerator in an air-tight container, cooked chicken can easily last up to 4-6 days, which makes chicken a great choice for your meal prep.  I use mason jars and these glass meal prep containers to keep my food fresh and safe, but any airtight containers will work.

If you plan to start meal prepping often, investing in some storage containers to keep your food fresh will not only save you space in your fridge, it will also save you money since you won’t have your food go bad too soon.

An overhead image of a kitchen counter with all the ingredients needed to assemble Healthy Chicken Fajitas, including cooked Fajita Chicken, cooked Fajita Bell Peppers and cooked Lime & Cilantro Black Beans.

WHAT ARE THE BEST HEALTHY TORTILLAS

Who doesn’t love tortillas, am I right? To make sure even my tortillas are super-healthy, I always choose whole grain or vegetable tortillas over plain ones. Put in a little extra effort and follow one of my easy homemade tortilla recipes, like this 4 Ingredient Spinach Tortilla recipe or learn how to make Homemade Corn Tortillas, and you;ve got yourself a tasty tortilla recipe to accompany your healthy chicken fajitas, if you want!

An overhead image of 3 meal prep containers with Healthy Chicken Fajitas made with Fajita Chicken, Fajita Bell Peppers and Lime & Cilantro Black Beans and ready to be stored in the refrigerator.

HOW TO MAKE CHICKEN FAJITAS HEALTHY

These Chicken Fajitas are packed with nutritious ingredients, lean protein, and fiber.  That means they’re not only good for your body, but also that you’ll feel satisfied and full for a long time after your meal, thanks to the protein, healthy fats, and fiber.  We’re also keeping our sodium intake in check by choosing low sodium black beans, low sodium chicken broth and low sodium soy sauce. Just clean, whole ingredients for maximum flavor.  It’s actually pretty easy to make chicken fajitas healthy.

An overhead image of a meal prep container with Healthy Chicken Fajitas made with Fajita Chicken, Fajita Bell Peppers and Lime & Cilantro Black Beans ready to be stored in the fridge.

HOW LONG CAN YOU KEEP CHICKEN FAJITAS IN THE FRIDGE

You can store these SEVEN meals in the fridge in an airtight container for up to 5-7 days.   I use these glass meal prep containers to keep my food fresh and safe, but any airtight containers will work.  When you’re ready to enjoy your meal, just reheat it in the microwave for 2 minutes and you’re good to go.

A side image of 6 meal prep containers with Healthy Chicken Fajitas, made with Fajita Chicken, Fajita Bell Peppers and Lime & Cilantro Black Beans stored in the fridge.

Healthy Chicken Fajitas Meal Prep | Meal Prep On A Budget (Just $3.37!)

Healthy Chicken Fajitas Meal Prep

This delicious and easy Healthy Chicken Fajitas Meal Prep is a low carb, high protein, and high fiber chicken meal prep recipe you’re gonna love. Bonus: this chicken meal prep is just 455 calories and is a great meal prep on a budget since each serving costs just $3.37!

For The Fajita Chicken:

  • 1/3 cup lime juice, ((approx. 2-3 limes))
  • 1/4 cup pineapple juice, (no sugar added)
  • 2 tbsp low sodium soy sauce
  • 1 clove garlic, (minced)
  • 1 tsp. ground cumin
  • 1 tsp. paprika
  • 1/2 tsp. red pepper flakes
  • 1 tsp. sea salt
  • 1/2 tsp. ground black pepper
  • 1/4 cup cilantro (chopped)
  • 2 tbsp. olive oil
  • 4 6-8 boneless, skinless chicken breasts

For the Fajita Bell Peppers:

  • 1 white onion, (thinly sliced)
  • 1 poblano chile, (thinly sliced)
  • 2 red bell peppers, (thinly sliced)
  • 1 green bell pepper, (thinly sliced)
  • 1 tsp. sea salt
  • 1/2 tsp. ground black pepper
  • 1/4 tsp garlic powder

For the Lime & Cilantro Black Beans:

  • 1 tbsp olive oil
  • 3 cloves garlic, (minced)
  • 1/2 jalapeño, ((1 tbsp) seeded and finely diced)
  • 1/2 tsp cumin
  • 2 15- ounce cans low sodium black beans, (rinsed and drained)
  • 1 cup low-sodium chicken broth
  • 2 tbsp fresh lime juice
  • 2 tbsp fresh cilantro, (chopped)
  • 1 tsp. sea salt

To Make The Fajita Chicken:

  1. In a large bowl or ziplock bag, combine the chicken breast with freshly squeezed lime juice, no sugar added pineapple juice, low sodium soy sauce, olive oil, minced garlic, ground cumin, smoked paprika, red pepper flakes, sea salt, ground black pepper, and chopped fresh cilantro.
  2. Place in the fridge for a minimum of 30 minutes, up to 8 hours.
  3. Once the chicken is marinated, heat 1 tbsp. olive oil over medium-high heat in a large skillet until hot.
  4. Add the marinated chicken, cooking on both sides until cooked through, about 4-6 minutes per side.
  5. Remove the chicken from the pan and set aside to rest. Slice into thin slices.

To Make the Fajita Bell Peppers:

  1. In the same pan used to cook the chicken, add sliced white onion, sliced poblano pepper, sliced red bell peppers, sliced green bell pepper, sea salt, and ground black pepper, and toss to combine.
  2. Cook over medium-high heat until the bell peppers and onion are tender, about 4-6 minutes.

To Make the Black Beans:

  1. Heat oil in large saucepan over medium-high heat.
  2. Add garlic, jalapeño, and cumin and cook for 1 minute, or until garlic is fragrant.
  3. Add the beans and broth and cook 5 minutes, stirring occasionally.
  4. Coarsely mash beans with a potato masher.
  5. Continue to cook at a simmer for about 8-10 minutes until the mixture is thick, stirring frequently.
  6. Add in lime juice, cilantro, and sea salt, to taste.
  7. To assemble the chicken fajita meal prep, start by adding the cilantro lime black beans to your meal prep container, followed by the sliced fajita chicken, and the bell pepper and onion mixture.

This post contains affiliate links for products I use often and highly recommend.

The post Healthy Chicken Fajitas Meal Prep | Meal Prep On A Budget (Just $3.37!) appeared first on A Sweet Pea Chef.


Healthy Black Bean Hummus Recipe

$
0
0

Spice things up with this Black Bean Hummus recipe made with jalapeños and cilantro. This healthy hummus dip is bursting with flavor with just the right amount of heat.

Healthy Black Bean Hummus Recipe | This Healthy Black Bean Hummus Recipe is a simple and easy hummus recipe with no Tahini | A Sweet Pea Chet

Hummus – the go-to dip of those with healthy lifestyles.

This healthy dip might look kinda boring at first, but, once you taste it, you fall in love with its creamy texture and amazing flavors.

As you probably already know, typically, hummus is made with chickpeas, tahini, olive oil, garlic, and lemon juice. Blended into a smooth puree, these fresh and clean ingredients create the irresistible hummus.

Once you discover hummus, it’s hard to go back to those unhealthy dips you thought you loved. But, trust me, you’ll want to get to know hummus better. And to give it different flavors.

Maybe to spice it up a bit.

Literally.

Are you with me?

Ok, good.

Don’t get me wrong, the classic hummus recipe is perfect as it is, but I was curious if I can make a different type of hummus that I can love as much as the traditional one.

It turns out I can. Hooray! Let me tell you how I did it.

HOW TO MAKE BLACK BEAN HUMMUS

So, how did I make black bean hummus?  First, I started by substituting chickpeas for black beans. Then I added cilantro and jalapeño. I also replaced the lemon juice with freshly squeezed lime juice.

In this black bean hummus, you have…

  • Heat from the jalapeño and the cayenne pepper
  • Nutritious  fiber and protein from the black beans
  • The classic garlic taste in traditional hummus
  • A hint of taco taste from cumin
  • Freshness from the lime and cilantro

So far so good. I really liked how this cilantro lime hummus turned out and hope you love it, too.  It’s kinda like bean dip meats hummus — which HELLO –> YUM!

IS HUMMUS GOOD FOR YOU?

Dips are yummy, enjoyable, easy to make (and to eat), but generally not that good for you.

However, that’s not the case for hummus.

Is hummus good for you, then?

Answer: Yes, it is! Woot!

Hummus is a healthy dip you can enjoy practically guilt-free so more reasons to learn how to make black bean hummus RN.

For example, consider the nutritional info in black bean hummus.  In one serving (2 tablespoons), you get 13 grams of protein, 9 grams of fat, 11 grams of fiber, and just 263 calories.

BLACK BEAN HEALTH BENEFITS

Continuing the talk on nutrition, let’s dive deeper, shall we?  Are black beans healthy?

Yes, they are. They TOTALLY are.

So, what are the health benefits of black bean, you ask?

Well, black beans are:

  • High in protein
  • High in fiber
  • Full of vitamins
  • Full of minerals
  • Low in calories

Black beans are a great protein source in vegan and vegetarian diets, too.

And you know what the best part is?

You can make black bean hummus without tahini. Classic hummus requires tahini to obtain that perfect taste and texture. That’s why hummus rarely tastes the same. Some restaurants use oil instead of tahini because oil is cheaper. But classic hummus without tahini is not technically classic hummus. The taste is not quite the same, and the texture is not the same.

There’s also the problem of too much tahini in hummus. That’s also not good.

Honestly, it seems like adding tahini is usually the reason why people avoid making hummus at home.

BUT for this black bean hummus recipe, you don’t need tahini.

That means this black bean hummus is an easy hummus recipe without tahini.

Let’s do a happy dance together.  (Sorry, tahini, you know I still love you!)

Chickpeas vs. Black Beans

Okay, then….Wondering who wins in the battle of chickpeas versus black beans?

Well, let’s analyze these 2 types of beans to see which one is better for you.

Chickpeas, also known as garbanzo beans, have the following nutritional info per 1 cup:

  • 729 calories
  • 121g carbs
  • 12g fat
  • 39g protein

Now, let’s take a look at black beans for the same 1 cup serving size:

  • 624 calories
  • 116g carbs
  • 17g fat
  • 39g protein

I pronounce black beans the winner of the chickpeas vs. black beans battle.  Black beans, for the same serving size, contain less calories, less carbs, and the same amount of protein than chickpeas.

As you can see, black beans are actually better than chickpeas and everybody knows chickpeas are healthy and good for you already!

Separated ingredients including black beans, garlic cloves, sliced jalapeno, cilantro, paprika, cayenne pepper in the food processor ready to be blended to make Healthy Black Bean Hummus.

HOW TO USE A FOOD PROCESSOR TO MAKE HUMMUS

The perfect hummus is creamy, smooth, and rich.

Sounds about right, no?

Plus, believe it or nor, it’s super easy to make.  All you really need to make perfect hummus is to combine all the ingredients in a food processor or a blender.

Just follow a few simple steps that will guarantee your hummus will turn out exactly how you want it.

Here are the steps for how to use a food processor to make homemade hummus:

  1. Drain and rinse the cooked beans.
  2. Combine all the ingredients for the hummus in the bowl of the food processor.
  3. Blend the hummus for 1 minute.
  4. Scrape down the sides of the bowl to integrate the larger chunks.
  5. Blend again until the hummus becomes smooth.
  6. If your hummus is thicker than you want, add 1-2 tablespoons of liquid (can be the reserved bean juice, lime juice, lemon juice, etc.), and blend again until the hummus is at your desired texture and consistency.

And the most important step – transfer to a bowl and dig in!

Freshly made Healthy Black Bean Hummus in the food processor.

HEALTHY ALTERNATIVES TO CHIPS

Ok, so hummus is healthy and good for you… but what about the potato chips?

Store-bought potato chips? We don’t need those!

There are healthy alternatives to chips that are just as good, if not waaaaay better, including:

  • pita (regular or baked into chops)
  • homemade corn tortilla chips
  • homemade sweet potato chips
  • bean chips
  • beet chips
  • rice cakes

So no need for high sodium, high processed potato chips for dipping anymore!

The last healthy alternative to chips is the healthiest option. It involves veggies.

And that’s not to mention all the numerous veggies that go with hummus. You can try:

  • Carrots
  • Cucumbers
  • Celery
  • Asparagus
  • Broccoli
  • Cherry tomatoes

These fresh veggies combined with hummus are PERFECTION.

But, you know what, you can make veggie chips if you want something crispy with your hummus. Carrots and sweet potatoes make delicious chips that are perfect for this black bean hummus recipe.  So many options!

Healthy Black Bean Hummus garnished with cilantro, jalapeno pepper, and cayenne pepper.

CAN I FREEZE HUMMUS?

Can you freeze hummus? Yes, you can.

But is it possible to do it without compromising on taste and texture?

Also yes!

I’m glad I can be the bearer of good news today 🙂

You can make as much hummus as you want and, if you want to freeze it, just follow these steps to make sure the hummus maintains its rich and creamy texture and its amazing flavors:

How To Freeze Hummus:

  1. Divide the hummus in small, airtight freezer containers so you’ll have ready-to-serve portions.
  2. Don’t fill the containers all the way to the top because hummus takes up volume when frozen.
  3. Drizzle the top with olive oil to keep the moisture in.
  4. Place the container(s) in the freezer.
  5. Defrost the hummus in the fridge for 24 hours.
  6. Remove the hummus from the fridge 30 minutes before serving.

Enjoy!

Healthy Black Bean Hummus garnished with cilantro, jalapeno, and cayenne pepper in a bowl ready to be served.

3 HEALTHY HUMMUS RECIPES

Now that you know how amazing hummus is, I’m sure you want to try other hummus recipes, too.  Here are other hummus options you might like:

HOW TO MAKE HUMMUS + 4 HEALTHY HUMMUS RECIPES

Learn how to make your favorite dip at home with my tips for How To Make Hummus and enjoy 4 Easy Hummus Recipes!

An overhead image of four glass bowls, each containing a different kind of Homemade Hummus including a bowl of Avocado Hummus, garnished with chickpeas and red pepper flakes, a bowl of Beet Hummus garnished with crumbled feta cheese and fresh parsley, a bowl of Sweet Potato Hummus garnished with fresh parsley and a bowl of Black Bean Hummus garnished with cilantro, jalapenos and cayenne.

Not only is dipping good for your soul, it’s also good for your body, especially if you’re making this chickpea-based dip at home and have the control over its ingredients. Get the recipe.

HOMEMADE HUMMUS

One hummus recipe is not enough. So that’s why I have another easy and healthy Homemade Hummus recipe for you.

Homemade Hummus | Easy, vegan, healthy, clean, and high-protein snack for the win! | A Sweet Pea Chef

This is the classic hummus recipe if you want. It includes chickpeas (garbanzo beans), toasted sesame seeds, and garlic. It’s also the recipe I use since I discovered I love hummus so you better believe this recipe never disappoints. Get the recipe.

CHICKEN AND HUMMUS GREEK WRAP

This Chicken & Hummus Greek Wrap is proof that with only a few ingredients you can create amazing flavors.

A close-up side image of an Avocado Turkey Hummus Wrap sliced in half, made with smoked deli turkey breast, hummus, avocado, muenster cheese, cucumber slices and roma tomatoes wrapped in a whole wheat wrap.

The wraps are not only flavorful and delicious, they are also easy to make and perfect for a quick lunch. I promise you will be amazed by the textures and flavors if you try them. Get the recipe.

Black Bean Hummus

Black Bean Hummus

Spice things up with Black Bean Hummus made with jalapenos and cilantro. This dip is bursting with flavor with just the right amount of heat.

  • 15 oz. can black beans, (drained and rinsed)
  • 1 jalapeño, (diced and seeds removed)
  • 1/4 cup cilantro
  • 1/2 tsp sea salt
  • 2 cloves garlic
  • 1 tsp ground cumin
  • 1/2 tsp paprika
  • 1 tbsp olive oil
  • 4 tbsp freshly squeezed lime juice
  • cilantro, cayenne pepper, and jalapeño, (for garnish)
  1. Add all ingredients except for garnish to a food processor.

  2. Blend this all together for a minute or so until it’s smooth.
  3. Garnish this spicy black bean hummus with a little more cilantro, jalapeno, and cayenne.

This post contains affiliate links for products I use often and highly recommend.

The post Healthy Black Bean Hummus Recipe appeared first on A Sweet Pea Chef.

Queso Dip With Ground Beef (No Velveeta Needed!)

$
0
0

This super cheesy Queso Dip with Ground Beef is so good! Spicy and savory, it’s a clean-eating dip that can be served with a Mexican dish or alongside your favorite snack!

Overhead view of Queso Dip With Ground Beef in a cast iron skillet, topped with cilantro and diced tomatoes.

We are definitely a queso-loving family.  If queso is on the menu at a restaurant, chances are we will try it. And, if it’s good, chances are pretty darn good we’ll be back again for more.

Because it is one of our fave snacks, I wanted to make a queso dip with ground beef and without Velveeta at home as well.

I know Velveeta is magical and all to many people, but I wanted to be able to totally control what was going into the dip.  So, in order to get a creamy consistency, you have to add a little arrowroot starch and cheese – it’s actually quite simple.  And, to be completely honest, Velveeta kinda scares me a little.  I mean, what IS it, really?  🙂

I also like this queso dip a lot because it combines the best parts of a chile queso with the best of a chile con carne queso (read: I like my chiles AND my ground beef, thanks).  I also like cheese.

Mmmm…..

If you’re looking for an appetizer to serve for the game or to snack on with the family in front of a movie, I think you’ll really enjoy this.  It takes about 25 minutes to make and stays a great consistency for quite a while – if it lasts that long.

I cook and serve mine in a cast-iron skillet to keep it hotter longer, too. To note, my family likes the spiciness a little lighter than some will. So, if you want your Queso Dip with Ground Beef to be spicier with a kick, double the serrano, jalapeno, and cayenne listed in my recipe.

Your gonna love this dip – I guarantee it. So, sit back, take a family break and enjoy this flavorful snack!

Overhead view of ground beef in a cast iron skillet, cooked and ready to add to Queso Dip With Ground Beef.

HOW TO MAKE QUESO DIP WITH GROUND BEEF

This absolutely scrumptious dip can be put together and enjoyed in just 25 minutes. It’s easy and goes with a ton of things. Follow these easy steps:

  1. Cook lean ground beef in a skillet
  2. Remove the beef, keeping the drippings in the skillet
  3. Cook the onions and chilies in the drippings, and then add the spices
  4. Add the onion and chile mixture to a blender along with the milk, cilantro, and diced tomatoes; then puree
  5. Return to the skillet, sprinkle with arrowroot starch, and cook 4-5 minutes until thickened
  6. Add the cheeses, stirring to melt
  7. Add the Greek yogurt, add back the ground beef, heat, and enjoy

Side view of chiles and onions in a skillet, diced and ready to cook for Queso Dip with Ground Beef.

HOW TO MAKE QUESO DIP WITH GROUND BEEF WITHOUT VELVEETA

Velveeta is made of milk protein concentrate, whey protein concentrate, preservatives, milk, and fat. There are other ingredients like lactic acid, sodium phosphate, and other additives.

It’s a “prepared cheese product,” and I’m just not big about including that in my healthy dip. That’s why I love this queso dip recipe. It’s clean eating and contains wholesome goodness like plain Greek yogurt and yummy cheese. To thicken it and make it creamy, use arrowroot starch.

Ingredients for Queso Dip With Ground Beef, ready to blend and including tomatoes, chiles, and onions.

HOW TO STORE AND REHEAT QUESO DIP WITH GROUND BEEF

This flavorful dip can be stored in an airtight container for up to 4 days. To reheat:

  • In the microwave, heat for 30-second increments, stirring in between
  • Warm on the stove in a heavy saucepan, stirring frequently
  • Reheat in the oven at 350F, checking often

I reheat mine in a cast-iron skillet, which also holds the heat as you enjoy the dip.

Side by side views of ingredients for Queso Dip With Ground Beef, ready to blend and then, blended.

HOW TO MAKE QUESO DIP WITH GROUND BEEF VEGAN, VEGETARIAN, AND GLUTEN-FREE

To make the queso dip vegan, vegetarian, or gluten-free, several substitutions can be made. 

  • The ground beef can be eliminated to make a vegetarian dish, and you can either omit entirely or add in mushrooms or tempeh

To make the dish vegan, follow these tips:

  • Grated potato can add creaminess to the dip
  • Raw cashews, when blended, can also add creaminess (soak them in advance if your blender does not blend them very finely)
  • Nutritional yeast can add a cheesy flavor

For those who need a gluten-free recipe, remember that cheese and Greek yogurt are typically gluten-free. However, you may want to check the labels to be sure. This goes for the spices that go into the recipe.

Closeup overhead view of Queso Dip With Ground Beef, garnished with cilantro and diced tomato.

WHAT TO SERVE WITH QUESO DIP WITH GROUND BEEF

This savory and spicy dip goes with everything! That’s a wonderful thing, because it means you can enjoy it even more often 🙂

Closeup side view of a hand holding a nacho and dipping into Queso Dip With Ground Beef.Close up side view of Queso Dip With Ground Beef with cilantro and tomato in a skillet, cooked and ready to eat.

MORE HEALTHY DIPS RECIPES

You can’t beat dip, am I right? I take every opportunity I can to sample a bowl of yumminess for dunking as an accompaniment to veggies, my favorite dishes, and more.

Queso Dip With Ground Beef Square Recipe Preview Image
Print

Queso Dip With Ground Beef

This super cheesy Queso Dip with Ground Beef is so good any time - not just on game day! Spicy and savory, it’s a clean-eating dip that can be served with a Mexican dish or alongside just about anything!
Course Appetizer, Clean Eating, gluten free, Paleo
Cuisine Easy
Keyword chili con queso with ground beef, chili con queso with meat, queso dip with ground beef
Prep Time 5 minutes
Cook Time 20 minutes
Total Time 25 minutes
Servings 8 servings
Calories 193kcal
Author Lacey Baier of A Sweet Pea Chef

Ingredients

  • 1 lb 90/10 lean ground beef
  • 1/2 tsp sea salt
  • 1/4 tsp ground black pepper
  • 1/2 yellow onion diced
  • 1 serrano pepper seeds and stem removed, finely diced*
  • 1/2 jalapeño pepper seeds and stem removed, finely diced
  • 1/2 tsp paprika
  • 1/2 tsp ground cumin
  • 1/4 tsp cayenne
  • 1/4 tsp garlic powder
  • 1/2 tsp chili powder
  • 1 cup whole milk
  • 1/2 cup chopped cilantro
  • 1/2 can diced tomatoes 15‐ounce, approx. 1 cup, drained
  • 1 tbsp arrowroot starch
  • 2 cups cheddar cheese grated
  • 2 cups Monterey Jack cheese grated
  • 2 tbsp full fat Greek yogurt
  • optional: sweet potato or corn tortilla chips for serving

Instructions

  • Heat a skillet over medium-high heat and add the ground beef. Season with salt and pepper and cook until well-browned, approx. 6-8 minutes. Once browned, remove meat from pan and set aside, reserving the pan drippings. If not enough drippings, add olive oil, as needed.
  • Add the diced onion and chiles to the drippings. You may need to add a tsp, or so olive oil at this time. Add the seasonings (paprika, cumin, cayenne, garlic powder, and chili powder) and stir to combine. Cook until tender, approximately 6-8 minutes.
  • Add the onion-chile mixture to a blender, along with the whole milk, cilantro, and diced tomatoes. Puree the contents until completely smooth. Once fully pureed, return the blended mixture to the pan and continue to heat over medium-high heat.
  • Sprinkle the arrowroot starch over the blended mixture and stir to combine. Cook 4-5 minutes, until mixture thickens.
  • Add cheeses and stir to combine.
  • Once all the cheese is melted, add the Greek yogurt and stir to combine. Return the meat back to the pan and heat through.
  • Serve immediately, with baked pita chips or corn tortilla chips if preferred.

Video

Notes

This queso, as written, has a mild level of heat - to kick up the spice, I'd recommend doubling the serrano and jalapeno and cayenne pepper (if you like it spicy). My kids and husband don't like it as spicy which is how I created the recipe.

Nutrition

Serving: 0.5cup | Calories: 193kcal | Carbohydrates: 5g | Protein: 27g | Fat: 15g | Saturated Fat: 8g | Cholesterol: 95mg | Sodium: 264mg | Potassium: 336mg | Fiber: 1g | Sugar: 3g | Vitamin A: 721IU | Vitamin C: 4mg | Calcium: 469mg | Iron: 2mg

This post contains affiliate links for products I use often and highly recommend.

The post Queso Dip With Ground Beef (No Velveeta Needed!) appeared first on A Sweet Pea Chef.


Latest Images